Monday, August 11, 2008

Keyboard: Sanding natural covers

It's time to sand the natural key covers. Some of them turned out to be a little irregular, tapering in thickness from side to side. The seam between fronts and backs also needs smoothing out.

I set up this drum sander on the Shopsmith, making it act like a thickness sander thanks to the Shopsmith's adjustable table height. That way not only are the key tops flattened properly but they'll end up parallel to the undersides:


After progressing from 150 grit to 600 grit and giving each key two or three slow passes, the key tops are smooth as glass.

Sunday, August 10, 2008

Keyboard: Sharp reliefs and head stop

A little more tweaking of the keys today:

First I had to cut a little relief area at the back of the natural fronts. When played, the sharps rock downwards in a slight arc, and the naturals must be trimmed back at the junction of the heads and tails to keep the front of the sharp from rubbing. I scribed a knife line at 10 degrees and cut out that area with a sharp chisel:


I also discovered that the keys were rubbing a bit at their back ends. It seems that slicing through the green felt glued to the key ends with the bandsaw created enough fuzz to cause quite a bit of friction between keys, so I sanded the key ends again. That worked: the keys now fall downwards under their own weight, which they hadn't been doing before.

Lastly I stapled a 2-1/4" strip of thick felt under the key fronts as padding to limit the downward travel of the keys. This head stop is a typically Italianate way of controlling the key depth:


Right now the keys are all falling downwards because they are unbalanced, but eventually they'll sit properly.

Saturday, August 9, 2008

Keyboard: Cutting out the sharps

With the keyboard cut apart into sections of 3 and 5 naturals and the sides of the sharps already cut, the next step is to finish cutting out the sharps by cutting through the front part of each with a fretsaw. I used a 32 TPI blade that's about 0.5 mm wide: thin enough to turn sideways and slide down the kerf between sharps and naturals:


Once the sharps were free, the natural sections remained, held together by the key heads:


These were cut apart at the bandsaw, and then the rack pins were inserted into the holes in each key end. Next, the sides of the keys were sanded to eliminate shavings and fuzz (the basswood used for the keys produces long stringy shavings when cut) and to make sure that no excess wood was visible beyond the edges of the boxwood key covers. Then the keys were installed onto the key frame:


Lots of work still remains: the sharps must be glued on, the keys must be balanced so that they fall back predictably, the boxwood surfaces must all be levelled, any unevenness in the key positions must be corrected, the balance pin mortises must be burnished so the keys operate without binding, and so on.

Friday, August 8, 2008

Keyboard: Cutting apart the naturals

The last thing to take care of with the key panel still in one piece is to glue a wide strip of felt along the back where the jacks will sit, to keep them from rattling against bare wood. I used fish glue for this, as it is said to be a good choice for gluing fabric and leather. It won't harden the bottom of the felt too much, which would reduce its effectiveness as a cushion.

Once the glue dried, I put a strip of wide masking tape on top of the felt and retraced the lines between the keys which had been covered up by the felt.

At the bandsaw, I installed a 5/8" thin kerf meat-cutting blade with very little set to the teeth. A wide blade is useful for cutting out keyboards as it tends to cut straight more easily, and a thin kerf means the blade doesn't eat into the key levers too much.

Cutting proceeds in several stages, starting from the back and working towards the front:
  • First, cut the keyboard into octaves along the lines between B and C
  • Next, cut each octave apart along the line between E and F
  • Cut along the lines between sharps and naturals up to the front of the key tails
  • Cut off the lowest (GG/BB) and highest (c''') keys
This leaves a bunch of keyboard sections 3 and 5 naturals wide:


The sharps are still attached at their fronts and will be cut out with a fretsaw.

The two outside keys are already detached at this point, since they don't belong to any of the sections shown above. I installed a rack pin into each and laid them in place on the key frame:

Thursday, August 7, 2008

Keyboard: Balance pins, rack pins and mortises

Before unscrewing the key panel from the key frame, I transferred the actual locations of the rack slots back onto the ends of the keys with a thin knife blade and a straight edge:


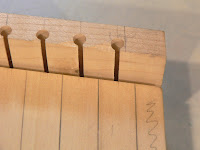
Then I removed the key panel and drove the balance pins into the key frame. They need to protrude enough so that the thickness of the red balance pin felts and cardboard punchings underneath the keys, along with the keys themselves, is accounted for:


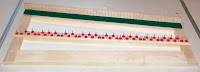
Also shown above is the green backrail cloth, which keeps the key ends from clacking against the key frame when they fall back.

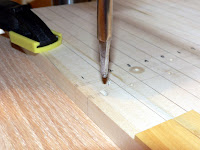
Next, I transferred all the scribe marks on the key ends down the rear edge of the key panel, and then I drilled the rack pin holes using a spare rack pin as the drill bit:


This ensures a fit that is snug but not super-tight. I don't think there's any need to drill 0.1 mm undersize for these, as I have with other pins.

Keys are made to pivot up and down on the balance rail by elongating the balance pin holes into slots that have a triangular profile when visualized from the size. Each slot narrows from the top surface of the key down to the underside, where the original balance pin hole of 3/32" diameter is preserved. To make such a slot, this special mortise punch is used:


The tool is tapered from front to back but has parallel left and right sides, which keeps the slot of constant width (0.096", to match the balance pins). The tip has a rounded section that ensures the punch won't cut through the hole on the underside. This hole must be preserved so that the key won't shift back and forth as it moves up and down.

In use, the tool follows the balance pin hole drilled earlier and basically crushes aside the key material as it makes the triangular profile. Because no material is actually removed, apart from what is lost when the balance pin holes are drilled, the slot can be fine-tuned in future: if it's too tight it can be burnished with a spare balance pin, and if it's too loose it can be soaked with water or steamed over a kettle to swell the wood fibers. This approach is safer than trying to cut an exact slot, because once material is cut away it's gone for good.

I chucked the punch into the drill press (with the power off, of course) which gave me a handle to press the tool down as well as a way of keeping it square to the key panel:


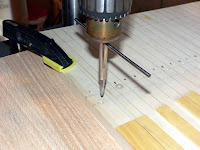
The punch has a straight metal rod passing through it which acts as a visual aid in getting the punch sides parallel to the left and right edges of each key. Clamping the panel helps when withdrawing the punch from each mortise slot, as it tends to get jammed in there.

Wednesday, August 6, 2008

Keyboard: Balance pin holes and rack slots

Keys must be guided in two places to keep them from shifting sideways as they are played. All keyboard frames have a balance rail slightly in front of the midpoint into which balance pins are set. These pass through holes in the keys. The second guide location varies among the various national styles of harpsichords, but a common arrangement for Italian harpsichords is to use a rack at the back of the key frame. A slotted strip of wood standing on edge receives metal pins or wooden slips driven horizontally into the key ends and restricts the keys to up-and-down motion only.

I'm using balance pins of 0.096" diameter and drilling a 3/32" hole to receive them. In order that the holes through the keys line up with the holes in the balance rail, the key panel is simply screwed onto the balance rail, after making sure that the panel is correctly positioned both back-to-front and side-to-side. Drilling holes this way is certain to align them properly, as any slight discrepancy is transferred from one part to the other:


The sharps have their balance pin holes offset to the rear, since their key levers are shorter.

Now for the rack itself. It must fit under the wrestplank so that the keyboard can be installed and removed freely. The key ends pivot in small arcs when played, so the rack can't be right up against back of the keyboard, nor can rack be much thicker than the upper belly rail or the back row of jacks might rub against it. These parameters determine the height and thickness of the board that will become the rack.

I'll be using 1.5 mm pins in the backs of the keys, so I want the rack slots to be 1.6 mm wide. This provides a minimal bit of clearance that avoids having the pins scrape up and down in slots that are too tight. The old makers made their rack slots with a dovetail profile so that the pins wouldn't jam inside the slots, the idea being to guide the pins with as small a contact surface as possible. Another way to accomplish this is to drill a bunch of oversize holes just shy of the front face of the rack:


These 3/16" holes were located by temporarily clamping the rack piece to the key frame and putting tick marks along the face at the midpoints of the key ends. The holes are drilled about 1 mm from the edge.

Next, the actual slots were routed with a 1.6 mm router bit and the table tilted at 8 degrees. No ordinary router table is capable of tilting, but the Shopsmith I'm using can do so, luckily for me. The slots must be angled because the back of the keyboard isn't square to the sides.

Once the slots were routed and residual fuzz cleaned up, the rack was glued to the back of the key frame:


Here it is with the glue dry and 2 screws (not seen) securing the left and right ends to the key frame:


Note that I've already glued the decorative maple arcades onto the key fronts. These are a little wider than necessary so that when the keys are cut apart the arcades will be trimmed flush with the sides of each key.

Lastly I have to transfer the exact locations of each rack slot back onto the rear edges of the keys so that the drill holes for the rack pins will let each pin enter the appropriate slot straight on.