Showing posts with label keyboard. Show all posts

Thursday, September 10, 2009

Debugging phase

Construction of the harpsichord is essentially done. Only the music desk remains to be made at some point.

The harpsichord has been playing since the end of August. I'm now in a kind of debugging phase in which I play the instrument and track down things that need improvement. So far I have
  • increased the depth of touch about 1/32" by substituting a thinner cloth for one of the two layers under the jackrail
  • shimmed up the keys with more punchings at the balance pin to help increase the depth of touch
  • moved both of my gap spacers which, despite my best efforts, had not been located exactly under the strings and were slightly rubbing the nearest jacks
  • tweaked the off positions of the registers to make sure the plectra cleanly miss the strings
  • glued little cloth squares between the registers so they don't touch themselves or the edges of the gap
  • done a little remedial voicing to quills that feel stiffer or sound louder than their neighbours

The main outstanding issue to be resolved is the troublesome repetition of notes in the bass. In this region the amplitude of the plucked strings is large. Damping can be problematic as a result, and the tongue is often flung backwards quite energetically when the jack descends and the plectrum touches the string. So I am experimenting with damper shapes, stiffer springs and various other factors in an effort to resolve this problem.

Monday, August 31, 2009

Keyboard hold-downs

As the keyboard was designed to transpose, the key frame must stop slightly short of the lower bellyrail to allow side-to-side motion. This means there's a bit of front-to-back slop when the keyboard is in place. In addition, the light weight of the keyboard means it might not stay still if the instrument is ever moved, which often involves flipping it onto its spine.

I made two hold-downs that attach to the baseboard inside the keywell, just behind the front rail of the key frame where the head stop cloth is stapled down. Here's one of them:


It's basically a scrap block and a mirror support clip used to attach mirror glass to walls. When the keyboard is in place, the mirror clip ensures the key frame is kept fully forward. It overlaps the rear edge of the front rail, holding the keyboard down:


The block can pivot out of the way if the rear screw is loosened. This releases the keyboard and allows it to be removed.

Sunday, July 19, 2009

Keywell blocks

Since the keyboard is narrower than the space it fits into, the remaining space is taken up with a pair of keywell blocks plus a transposing block. The keywell blocks are shown below, glued up against the decorative front edges of the case:


In order to make sure the first and last keys don't rub against these blocks, 2 mm shims were glued to the left and right edges of the key frame:


The removable transposing block, shown below, allows the pitch of the instrument to be changed by shifting the keyboard sideways to fill the space left over when the block is removed. The block is held in place with two rare-earth magnets that are attracted to nail heads inside the keywell.


The keyboard shifts by one jack position, which allows a pitch of A=415 Hz when to the left and A=440 Hz when to the right.

Determining the proper thickness of the keywell blocks is an important part of making sure that the keyboard is properly aligned with the jacks: if not, the jacks could slip sideways off the key ends. I did this by progressively planing the blocks down and putting them in place, then sliding the keyboard left and right and observing how the jacks sat on the keys in both the left and right positions. When everything looked good, I glued the blocks in, then planed down the transposing block to fit the leftover space.

Friday, October 3, 2008

Keyboard: Completed

The keyboard is done.


After two coats of Danish oil, rubbed in between with extra-fine steel wool, and a light coat of wax, the keys have a lovely sheen and a silky-smooth feel under the fingers. The naturals have a golden glow and the sharps are dark and glossy. The scribe lines on the naturals have darkened and are more prominent now.

On to the case moldings now...

Tuesday, September 30, 2008

Keyboard: Applying finish

A view of the keys with one coat of Danish oil applied:


Even with just one coat, the keys have taken on a subtle sheen and the naturals have become more golden-coloured.

At least one more coat to go...

Monday, September 29, 2008

Keyboard: Keys rounded over

A good keyboard has all sharp wooden edges and corners eased to avoid discomfort. In addition, the front portions of the naturals have their edges and corners noticeably rounded over: this is partly cosmetic, but I think it also protects the fingers when the hands skim along the keys during performance.

I eased both naturals and accidentals with 600-grit sandpaper; a few swipes were usually enough to do the job. To round over the front parts of the naturals, I used 320-grit paper and sanded up to the first scribe line, holding a razor blade on edge in the line to keep from sanding too far back:


This rounding-over provides some nice shadow lines, in addition to being comfortable under the fingers.

The only thing left to do now is apply finish to the keys. I plan to use two coats of a clear Danish oil (an oil/varnish blend), followed by a light application of paste wax. Perhaps at some point in the future this might need to be re-done when the keys wear, but reapplying an oil finish is not at all difficult. Polyurethane is to be avoided on keyboards, as I've heard it wears off irregularly and looks awful after a while.

Keyboard: Details

Some further work on the keyboard:

Behind each sharp, I stained the top surface of the key lever black with an ebony stain for about a half-inch. This is a purely cosmetic detail often found on instruments with dark-coloured accidentals, and makes the sharp seem to blend into the back of the key. I did not stain any part of the key that is hidden behind the nameboard.

Each rack slot was rubbed with a very soft 6B graphite pencil to lubricate the slot and reduce any rubbing noises when the keys are played. The one minor defect in the rack guide design is that the slots run perpendicular to the grain: hence the rack pins bear on severed end grain fibers, which are a little rough. Fortunately the noise is usually covered by the music.

Saturday, September 6, 2008

Keyboard: Levelling keys

After correcting unwanted tilt and unsightly gaps, the final cosmetic adjustment to the key positions is to ensure the rows of naturals and sharps are each at a consistent horizontal level. This is accomplished with paper shims of various thicknesses, which are placed under the red balance pin felt that insulates each key from the key frame.

I did this levelling strictly by eye. Usually a proper levelling is assisted with a thread stretched along the key fronts as a guide, but for now here's the result using my good old-fashioned eyeballs:


Levelling must take place after balancing, because the keys might not fall back properly until balanced and this could affect the level of the front edges.

The quantity of shims together with the thickness of the red head stop cloth under the key fronts gives a depth of touch of 1/4", which is typical for an Italian harpsichord. Maximum depth is determined by the sharps: if they are level with the naturals when depressed, the touch is too deep and extra notes might get played by mistake. On an instrument with two rows of jacks, the minimum depth must be enough for both rows to play successfully, as they pluck one after the other and not simultaneously.

I may have to repeat the levelling process in future, when the instrument is finally playing and the various action felts start getting compressed.

Keyboard: Balancing keys

Each key on the keyboard needs to be balanced so that it falls back reliably when played and released. This is accomplished either by lightening the portion of the key in front of the balance rail, or by weighting the portion behind the balance rail, or sometimes a combination of both.

French harpsichords usually employ the first approach, undercutting the undersides of the playing portions of the keys quite a bit to eliminate as much forward weight as practical. This approach can be used on other instruments as well. Since my keyboard is made of basswood, instead of a hardwood like beech or chestnut more typical of the Italian harpsichord-making tradition, I elected to balance my keys by weighting, which I think may also give them the slightly heavier feel of hardwood key levers.

By balancing my keys individually on a thin slip of wood, I found all of them to be front-heavy: not surprising, given that these keys are on the short side as a result of the Trasuntino's significantly angled gap and smallish wrestplank depth. I elected to use two sizes of weights: one 6 mm wide and 4 mm long, the other 1/4" wide and about 7/16" long, the latter cut by hand from a lead wire several feet long.

First I drilled holes 9/32" in diameter for the large weights, as far back as I could without getting too close to the rack pin:


This took care of the coarse balancing and made the keys back-heavy.

To complete the balancing, I placed a U.S. penny (weight 2.500 g) at the front edge of each sharp and centred on the scribe lines of each natural. This added weight at the front and tipped each key forward again. I then put a small weight on the key and started shifting it backward very slowly until the key just tipped back, as shown below:


I marked the final position of the small weight and drilled a hole for it. A few keys needed more than one small weight, but in the end all were balanced.

Balancing with a temporary weight in front gives a little extra reliability to the return of the keys when released, which will be assisted further by the weight of two jacks resting on their far ends. Some say that this method of balancing also reduces the possibility of an accidental brush of a key triggering an unwanted note, since the keys will require deliberate pressure to respond.

Keyboard: Easing keys

The balance pin holes and mortises are all a little snug at present and the keys need to move as freely as possible without actually being loose, so all the mortises and holes need to be eased to reduce friction.

I used this tapered reamer, which reaches a diameter of 3/32" (matching the balance pins) roughly at its midpoint:


A reamer is a cutting tool and I have previously stated that it isn't a good idea to cut material away when easing keys, in case one goes too far and needs to undo the adjustment. I tried to press the reamer into the balance pin hole from below without twisting it, which would bring the cutting flutes into play. To ease the mortise portion, I put each key onto the leftmost balance pin of the key frame (as shown above) and worked it up and down firmly, letting the pin burnish the mortise sides.

What I'm aiming for is to be able to lift each key straight up on the balance pin and have it slide back down on its own when released. That strikes a good balance between looseness and tightness.

Keyboard: Gluing on sharps

With tilted keys and uneven gaps between keys now corrected, it's time to glue the sharps on.

First I needed to make sure of the final lengths of the sharps to ensure their back ends wouldn't collide with the nameboard when the keyboard was in place. Until now there has been no nameboard, so I went ahead and made one, set the keyboard into the instrument and slid the new nameboard into place. The point was to check whether the front layout line drawn on the key panel (still visible on the sharp levers) aligned with the front face of the nameboard. It did, so I was able to establish a final sharp length, cut the necessary quantity of sharps from my ebony sticks and bevel the front of each sharp at the strip sander to a 10 degree angle.

Next, a straightedge was clamped along the final position of the sharp fronts, leaving a clearance of 1 mm between the naturals and sharps. With a flashlight shining up from underneath the key frame, each ebony sharp was visually centred in the gap between natural key tails and glued down with thick cyanoacrylate glue:


The oily nature of ebony can make it problematic to glue, so the undersides of the sharps were wiped down with lacquer thinner just before gluing to remove any residue that might interfere.

When the glue dried, I put the keyboard and nameboard back into the instrument to see how everything looked:


The nameboard is presently too tall but can easily be trimmed to size later on.

Keyboard: Cosmetic adjustments

I spent a lot of time in August watching the Olympics, but various little things still got accomplished on the keyboard.

Despite drilling the balance pin holes squarely and installing the pins carefully, some the of the keys ended up tilted slightly out of the horizontal, which I think is pretty much normal no matter who is making the keyboard. Correcting this was a threefold process.

First the affected keys had their balance pins tapped sideways with a hammer to bring the key surface level again. However, doing so also moved the key sideways at the same time, creating unequal gaps on either side. That meant the rack pin hole in the affected key end had to be redrilled and the rack pin relocated into the new hole. The new position was about half a hole diameter to one side, which was usually enough to correct the gaps. Sometimes the very back of the key lever ended up rubbing its neighbour after these adjustments, so the rear edge was sanded a little more to restore clearance.

In keeping with historical tradition, I scribed a fine line across the joint between key fronts and backs, and a second line about 4 mm in front of this. The second line will act as a reference point later when the edges of the key fronts are gently rounded over to this mark. These lines are not only cosmetically appealing but also serve as a fine example of our ancestors' tendency to allow construction details to remain visible in the finished product.

Fixing the sharps was a simpler process. First I temporarily laid the ebony sharp caps in playing position and, after a visual inspection, tapped balance pins as above to re-level where necessary. The side-to-side positions of the sharp levers is not that important as the sharp caps are centred at the moment of gluing, but the levers, for cosmetic appeal, shouldn't be any wider than the base of each sharp. I narrowed the sharp levers between the natural key tails by sanding the sides, checking that no wood peeked out when the sharp caps were laid in place. Resetting rack pins was thus unnecessary, and only a little sanding of the key lever ends was required to restore clearances as with the naturals.

Monday, August 11, 2008

Keyboard: Sanding natural covers

It's time to sand the natural key covers. Some of them turned out to be a little irregular, tapering in thickness from side to side. The seam between fronts and backs also needs smoothing out.

I set up this drum sander on the Shopsmith, making it act like a thickness sander thanks to the Shopsmith's adjustable table height. That way not only are the key tops flattened properly but they'll end up parallel to the undersides:


After progressing from 150 grit to 600 grit and giving each key two or three slow passes, the key tops are smooth as glass.

Sunday, August 10, 2008

Keyboard: Sharp reliefs and head stop

A little more tweaking of the keys today:

First I had to cut a little relief area at the back of the natural fronts. When played, the sharps rock downwards in a slight arc, and the naturals must be trimmed back at the junction of the heads and tails to keep the front of the sharp from rubbing. I scribed a knife line at 10 degrees and cut out that area with a sharp chisel:


I also discovered that the keys were rubbing a bit at their back ends. It seems that slicing through the green felt glued to the key ends with the bandsaw created enough fuzz to cause quite a bit of friction between keys, so I sanded the key ends again. That worked: the keys now fall downwards under their own weight, which they hadn't been doing before.

Lastly I stapled a 2-1/4" strip of thick felt under the key fronts as padding to limit the downward travel of the keys. This head stop is a typically Italianate way of controlling the key depth:


Right now the keys are all falling downwards because they are unbalanced, but eventually they'll sit properly.

Saturday, August 9, 2008

Keyboard: Cutting out the sharps

With the keyboard cut apart into sections of 3 and 5 naturals and the sides of the sharps already cut, the next step is to finish cutting out the sharps by cutting through the front part of each with a fretsaw. I used a 32 TPI blade that's about 0.5 mm wide: thin enough to turn sideways and slide down the kerf between sharps and naturals:


Once the sharps were free, the natural sections remained, held together by the key heads:


These were cut apart at the bandsaw, and then the rack pins were inserted into the holes in each key end. Next, the sides of the keys were sanded to eliminate shavings and fuzz (the basswood used for the keys produces long stringy shavings when cut) and to make sure that no excess wood was visible beyond the edges of the boxwood key covers. Then the keys were installed onto the key frame:


Lots of work still remains: the sharps must be glued on, the keys must be balanced so that they fall back predictably, the boxwood surfaces must all be levelled, any unevenness in the key positions must be corrected, the balance pin mortises must be burnished so the keys operate without binding, and so on.

Friday, August 8, 2008

Keyboard: Cutting apart the naturals

The last thing to take care of with the key panel still in one piece is to glue a wide strip of felt along the back where the jacks will sit, to keep them from rattling against bare wood. I used fish glue for this, as it is said to be a good choice for gluing fabric and leather. It won't harden the bottom of the felt too much, which would reduce its effectiveness as a cushion.

Once the glue dried, I put a strip of wide masking tape on top of the felt and retraced the lines between the keys which had been covered up by the felt.

At the bandsaw, I installed a 5/8" thin kerf meat-cutting blade with very little set to the teeth. A wide blade is useful for cutting out keyboards as it tends to cut straight more easily, and a thin kerf means the blade doesn't eat into the key levers too much.

Cutting proceeds in several stages, starting from the back and working towards the front:
  • First, cut the keyboard into octaves along the lines between B and C
  • Next, cut each octave apart along the line between E and F
  • Cut along the lines between sharps and naturals up to the front of the key tails
  • Cut off the lowest (GG/BB) and highest (c''') keys
This leaves a bunch of keyboard sections 3 and 5 naturals wide:


The sharps are still attached at their fronts and will be cut out with a fretsaw.

The two outside keys are already detached at this point, since they don't belong to any of the sections shown above. I installed a rack pin into each and laid them in place on the key frame:

Thursday, August 7, 2008

Keyboard: Balance pins, rack pins and mortises

Before unscrewing the key panel from the key frame, I transferred the actual locations of the rack slots back onto the ends of the keys with a thin knife blade and a straight edge:
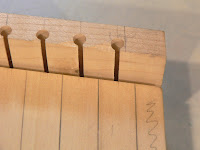

Then I removed the key panel and drove the balance pins into the key frame. They need to protrude enough so that the thickness of the red balance pin felts and cardboard punchings underneath the keys, along with the keys themselves, is accounted for:
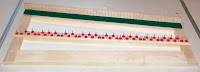

Also shown above is the green backrail cloth, which keeps the key ends from clacking against the key frame when they fall back.

Next, I transferred all the scribe marks on the key ends down the rear edge of the key panel, and then I drilled the rack pin holes using a spare rack pin as the drill bit:


This ensures a fit that is snug but not super-tight. I don't think there's any need to drill 0.1 mm undersize for these, as I have with other pins.

Keys are made to pivot up and down on the balance rail by elongating the balance pin holes into slots that have a triangular profile when visualized from the size. Each slot narrows from the top surface of the key down to the underside, where the original balance pin hole of 3/32" diameter is preserved. To make such a slot, this special mortise punch is used:
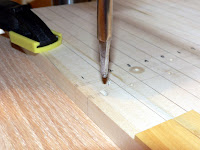

The tool is tapered from front to back but has parallel left and right sides, which keeps the slot of constant width (0.096", to match the balance pins). The tip has a rounded section that ensures the punch won't cut through the hole on the underside. This hole must be preserved so that the key won't shift back and forth as it moves up and down.

In use, the tool follows the balance pin hole drilled earlier and basically crushes aside the key material as it makes the triangular profile. Because no material is actually removed, apart from what is lost when the balance pin holes are drilled, the slot can be fine-tuned in future: if it's too tight it can be burnished with a spare balance pin, and if it's too loose it can be soaked with water or steamed over a kettle to swell the wood fibers. This approach is safer than trying to cut an exact slot, because once material is cut away it's gone for good.

I chucked the punch into the drill press (with the power off, of course) which gave me a handle to press the tool down as well as a way of keeping it square to the key panel:
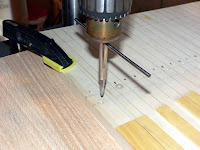

The punch has a straight metal rod passing through it which acts as a visual aid in getting the punch sides parallel to the left and right edges of each key. Clamping the panel helps when withdrawing the punch from each mortise slot, as it tends to get jammed in there.

Wednesday, August 6, 2008

Keyboard: Balance pin holes and rack slots

Keys must be guided in two places to keep them from shifting sideways as they are played. All keyboard frames have a balance rail slightly in front of the midpoint into which balance pins are set. These pass through holes in the keys. The second guide location varies among the various national styles of harpsichords, but a common arrangement for Italian harpsichords is to use a rack at the back of the key frame. A slotted strip of wood standing on edge receives metal pins or wooden slips driven horizontally into the key ends and restricts the keys to up-and-down motion only.

I'm using balance pins of 0.096" diameter and drilling a 3/32" hole to receive them. In order that the holes through the keys line up with the holes in the balance rail, the key panel is simply screwed onto the balance rail, after making sure that the panel is correctly positioned both back-to-front and side-to-side. Drilling holes this way is certain to align them properly, as any slight discrepancy is transferred from one part to the other:


The sharps have their balance pin holes offset to the rear, since their key levers are shorter.

Now for the rack itself. It must fit under the wrestplank so that the keyboard can be installed and removed freely. The key ends pivot in small arcs when played, so the rack can't be right up against back of the keyboard, nor can rack be much thicker than the upper belly rail or the back row of jacks might rub against it. These parameters determine the height and thickness of the board that will become the rack.

I'll be using 1.5 mm pins in the backs of the keys, so I want the rack slots to be 1.6 mm wide. This provides a minimal bit of clearance that avoids having the pins scrape up and down in slots that are too tight. The old makers made their rack slots with a dovetail profile so that the pins wouldn't jam inside the slots, the idea being to guide the pins with as small a contact surface as possible. Another way to accomplish this is to drill a bunch of oversize holes just shy of the front face of the rack:


These 3/16" holes were located by temporarily clamping the rack piece to the key frame and putting tick marks along the face at the midpoints of the key ends. The holes are drilled about 1 mm from the edge.

Next, the actual slots were routed with a 1.6 mm router bit and the table tilted at 8 degrees. No ordinary router table is capable of tilting, but the Shopsmith I'm using can do so, luckily for me. The slots must be angled because the back of the keyboard isn't square to the sides.

Once the slots were routed and residual fuzz cleaned up, the rack was glued to the back of the key frame:


Here it is with the glue dry and 2 screws (not seen) securing the left and right ends to the key frame:


Note that I've already glued the decorative maple arcades onto the key fronts. These are a little wider than necessary so that when the keys are cut apart the arcades will be trimmed flush with the sides of each key.

Lastly I have to transfer the exact locations of each rack slot back onto the rear edges of the keys so that the drill holes for the rack pins will let each pin enter the appropriate slot straight on.

Saturday, July 26, 2008

Keyboard: Natural covers complete

All the natural key covers have now been glued on, and the left side of the keyboard has had a little wood grafted on to correct my miscutting of the key panel:


The last couple of keys in the treble were slotted at the backs of the tails to provide a little room for creating the balance pine mortises. You can see the two lines for these mortises marked in pencil and labelled with a natural and sharp:


Most of the mortises will not interfere with the key backs, so only a few slots were needed.

Tuesday, July 22, 2008

Keyboard: Natural backs

Now it's time to glue down the natural back portions, but this isn't quite as simple a task as gluing down the fronts was.

It all boils down to the fact that the typical keyboard octave is divided into two unequal parts of 3 naturals (C-E) and 4 naturals (F-B) in front, while the back is divided into 5 and 7 parts, respectively, when the accidentals and naturals are considered together (C-C♯-D-E♭-E and F-F♯-G-G♯-A-B♭-B). Thus the rear part of the keyboard has a width of 3/5 of a natural in the lower part of the octave and 4/7 in the upper part: a paradox, it would seem.

What ends up happening depends on how one approaches the process of gluing on the natural key covers. It's possible to glue down one-piece rectangles that are as wide as the key fronts, reaching all the way to the back of the key and overlapping where the accidentals will later go. One then draws out the keyboard design using a keyboard ruler, which is basically a pattern showing where the accidentals are. The backs of the naturals automatically appear in the spaces between the accidentals. The keyboard is then sawn apart, the wood covering the accidentals is removed—a reversible glue like hide glue must obviously be used—and the sharps are glued on.

The second option is to use separate key fronts and backs, and let the act of gluing down the backs automatically leave space for the accidentals. To do so, a few observations on the general layout of keyboards are worth noting:
  • The front and back of C are flush along their left edges (the same is true for F)
  • The front and back of E are flush along their right edges (the same is true for B)
  • The middle of the back of D is aligned with the middle of the front of D
  • The middle of G♯ is aligned with the middle of the gap between G and A

When these facts are digested, the layout of the keyboard using separate fronts and backs is largely reduced to finding the proper position of the backs of G and A such that the F♯, G♯ and B♭ keys aren't hemmed in too much by the adjacent naturals. If the key backs are all identically sized, the paradox described earlier is resolved by letting the gaps between neighbouring keys vary slightly in the two parts of the octave.

To be on the safe side, I took some of my sharp stock, which was purchased in the form of a stick of ebony already milled to the correct cross-section (narrower on top and wider at the base), and cut myself 5 sharps about 2.5" long. Then I temporarily attached natural backs against the fronts in various positions with double-sided tape and checked to see if the sharps fit correctly. The C-E portion of the octave was fine; F-B needed some juggling. With a ruler accurate to 0.5 mm, I made notes of how far each back was from the right-hand edge of the corresponding front for the notes D, G and A.

Here's the setup used to glue the backs:


This is largely the same as that used for the fronts, except the triangle used to align each piece now has the ruler taped to it to help take measurements:


The green piece of tape has the name of each note written on it, as a mistake in laying down the backs would be quite serious. I'm using a thick cyanoacrylate glue to attach the covers, and there's no turning back once the stuff cures.

The far ends of the keys must match the spacing of the jacks, which is of course determined by the registers. This is easily done by laying the register along the line showing the position of the wrestplank gap and ticking off each slot:


These tick marks will be connected to the rear edges of the key backs with pencil lines showing where each key is to be sawed out.

Note that the final few key backs haven't been glued on yet. This is because the key backs come very close to the balance pins in the extreme treble, so I'll have to notch the top couple of backs slightly to allow the key to move without interference.