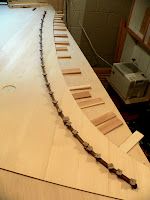
In the old days, bridge curvature on an Italian instrument was established at the moment of gluing, by simply forcing the bridge into the proper curve and clamping it. When the glue was dry, the curve would hold. I was tempted to try this, but in practice-bending my bridge I found quite a lot of force was required, even though the bridge did make the curve without breaking.
I decided instead to pre-bend the bridge more or less to the proper shape using dry heat. The bentside of the soundboard acted as a template of the appropriate curvature, which I traced in pencil onto a large sheet of plywood. Next I screwed little wooden blocks at intervals along this pencil mark.
By heating short stretches of the bridge with a 1500W heat gun, I was able to bend and clamp it to the blocks. The amount of heat required was considerable; my sources recommended heating just short of scorching. In fact, some parts of the bridge did get toasted a bit, but since walnut is naturally brown the scorch marks simply look like natural variations of colour.

Once the bridge cooled it held its bend, although wood bent through any means always "springs back" somewhat after it is unclamped due to its natural elasticity. So the resulting curvature was not perfect, but only minimal effort was now required for the bridge to assume its proper shape.
To glue the bridge down, I borrowed a trick from the kit-building world. First I placed the bridge on the pencilled curve on the soundboard and clamped it into place, bending it as necessary to match. Next, safely away from the future locations of the bridge pins, I marked places where I could drill holes right through the bridge. Each hole received a padded nail: a nail pushed through a couple of pieces of thick cardboard. These little pads keep the bridge from being crushed by the nail head when the nail is hammered down, and afterwards a set of pliers can grab the cardboard and pull out the nail.
Before gluing the bridge, the workshop humidity needs to be 45%. Later, when the ribs are glued, the humidity will need to be reduced further.
With nails in each hole, I used the nail points to make sure the bridge was precisely over the pencilled curve, and then I tapped the nails in partway:

I've left just enough room to get the narrow spout of my special glue bottle under the bridge. Note also that a portion of the soundboard rose has already been glued in place. A matching parchment ring will be glued on from above.
When I was satisfied with everything, the nails were driven home, through bridge and soundboard into the plywood sheet, until the nail heads started to compress the cardboard. I noticed that the outside edge of the bridge had a tendency to tip upwards, so to make absolutely sure it was flat against the soundboard, I slid some thin cedar wedges under the board, which forced it up against the bridge from underneath.

The bass hook—the straight part of the bridge in the extreme bass—was glued on next.
After the glue dried, the nails were pulled out and all the nail holes were masked with dark brown wax. Short brass tacks were nailed into the existing holes from underneath the soundboard to provide additional reinforcement for the bridge glue joint.
The bridge pins were located using the same register-holding jig used to mark the bridge pin locations on the soundboard. Pin pricks were made in the bridge to identify the pin locations for both sets of strings, then holes were drilled to a depth of about 10 mm. I used a #57 drill bit for these holes, which is about 0.1 mm narrower than my 1.2 mm bridge pins, ensuring that the pins fit tightly. All the holes were drilled leaning slightly towards the spine, so that in future the strings won't "climb up" the pin but stay pressed against the bridge. Then the pins were installed with a special pin-pushing tool that seated the pins to a uniform depth, leaving several millimetres projecting.
No comments:
Post a Comment